
Keeping a plant alive in soil feels like a full-time job sometimes. I used to struggle with the constant cycle of overwatering and then forgetting to water my herbs until they turned into crispy sticks. Then I discovered that you can actually grow an entire kitchen garden using just jars of water.
It sounds like magic, but it’s actually incredibly simple and saves so much space. If you have a windowsill and a few glass jars, you have everything you need to start. I’ve spent the last year experimenting with which greens actually thrive in a liquid-only environment, and I’m never going back to messy potting mix.
Why Grow Herbs in Water?

Growing your own seasonings without soil is a total game-changer for anyone living in an apartment or dealing with a short growing season. You don’t need to worry about soil-borne pests or making a mess on your kitchen counters. It’s a clean, aesthetic way to keep fresh flavors within arm’s reach while you’re cooking.
I love how it turns my kitchen into a lush, green sanctuary without the heavy lifting of traditional gardening. Plus, seeing the roots grow through the glass is actually pretty fascinating. It’s like a science experiment that you can eat, and it works perfectly regardless of the weather outside.
1. Low Maintenance and Beginner-Friendly
If you’ve ever killed a succulent, this method is for you because it removes the guesswork of watering. You never have to wonder if the soil is too dry or too soggy. You just look at the jar and see if the water level is low.
I find this much more relaxing than traditional gardening. You skip the weeding, the digging, and the expensive bags of fertilizer. It’s the ultimate “set it and forget it” project for busy people who still want a green thumb.
2. Grow Herbs Indoors Year-Round
Winter usually kills off my outdoor garden, which used to bum me out. By moving my herbs into water jars indoors, I get to ignore the frost entirely. Your kitchen stays at a relatively stable temperature, which these plants love.
You don’t need a greenhouse or fancy equipment to make this work. A sunny spot on your counter provides enough light to keep these herbs producing leaves even in December. This setup ensures you have fresh garnishes every single day of the year.
3. Continuous Harvest
When you grow herbs in water, they stay in a state of constant growth. Unlike soil-grown plants that might go dormant or struggle with root-bound issues, water-grown herbs keep pushing out new foliage. You can snip off what you need for dinner, and the plant just keeps on going.
I’ve noticed that some herbs, like mint, actually grow faster in water than they do in my backyard. You get a steady supply of leaves without waiting weeks for the plant to recover from a harvest. It’s the most efficient way to manage a small-scale indoor garden.
4. Cost-Effective
Buying those little plastic clamshells of fresh herbs at the grocery store is a total rip-off. They usually wilt within three days anyway. By growing your own in water, you pay for the initial plant once and then enjoy free herbs forever.
You can even start your water garden using cuttings from store-bought organic herbs. Just pop a healthy stem into a jar, and you’ve just turned a $3 purchase into a lifetime supply of food. IMO, it’s one of the best ways to slash your grocery bill.
5. Eco-Friendly
Traditional gardening uses a surprising amount of plastic pots and peat-based soils that aren’t great for the environment. Growing in water allows you to upcycle old glass jars like jelly jars or pasta sauce containers. You’re reducing waste while producing your own food.
You also use significantly less water overall because none of it evaporates into the soil or leaks out the bottom of a pot. Every drop goes directly to the plant’s roots. It’s a sustainable hobby that looks beautiful and feeds your family.
How to Grow Herbs in Water: Step-by-Step

Getting started is straightforward, but you do need to follow a few basic rules to keep your plants healthy. You can’t just throw a leaf into a cup and hope for the best. Success starts with the right cut and the right location.
I usually spend about ten minutes a week checking on my jars. It’s a low-effort habit that pays off in huge dividends of flavor. Follow these steps to ensure your new water garden doesn’t just survive, but thrives.
1. Choose Healthy Cuttings
You want to start with a strong, healthy stem that is about 4 to 6 inches long. Look for stems that haven’t started flowering yet, as they have more energy for root growth. Always use a sharp, clean pair of scissors to avoid crushing the stem.
Remove the bottom leaves so that no foliage sits below the water line. Leaves left in the water will rot and kill your plant. I aim for a clean stem with a few sets of leaves at the very top.
2. Use the Right Container
Glass is your best friend here because it allows you to monitor root health and water clarity. I prefer amber or colored glass jars to help block out some light, which prevents algae growth. If you use clear jars, just keep an eye on the green gunk.
Narrow-necked bottles are great because they support the stems and keep the leaves out of the water. Mason jars or even old spice bottles work perfectly for smaller cuttings. Just make sure the container is clean before you start.
3. Fill with Clean Water
Avoid using straight tap water if it’s heavily chlorinated, as it can shock the tender stems. I usually let my tap water sit out overnight to let the chemicals dissipate. Spring water or filtered water is even better for your herbs.
Fill the jar enough to submerge the bottom nodes (where the leaves were) but keep the remaining leaves dry. Oxygen is vital, so leave a little space between the water surface and the top of the jar. This helps the roots “breathe” as they develop.
4. Place in Bright, Indirect Light
Most herbs need plenty of light, but direct afternoon sun can actually cook the water in a glass jar. This leads to overheated roots and rapid algae blooms. A north or east-facing window usually provides the perfect amount of glow.
If your kitchen is a bit dark, you can use a small LED desk lamp to supplement the light. Consistent light is the secret to keeping your herbs from getting “leggy” or weak. Aim for about 6 to 8 hours of light per day.
5. Change the Water Regularly
Stagnant water loses oxygen and grows bacteria, which will rot your roots. I make it a habit to change the water every 5 to 7 days. If the water looks cloudy or smells funky, change it immediately.
When you swap the water, give the jar a quick rinse to remove any film. Fresh water provides a boost of oxygen that keeps the plant’s “circulatory system” running smoothly. It’s the easiest way to prevent plant death.
6. Harvest Often
Don’t be afraid to use your herbs! Regular pruning actually encourages the plant to branch out and grow more leaves. I never take more than a third of the plant at once to ensure it has enough energy to recover.
When you snip a stem, try to cut just above a leaf node. This tells the plant to send out two new stems from that spot. Frequent harvesting keeps the plant compact and prevents it from becoming a tangled mess in your window.

12 Herbs You Can Grow in Water All Year Round
Now for the fun part—choosing your plants. Not every herb loves water, but these twelve are absolute rockstars in a hydroponic-style setup. I’ve tested these personally, and they are the most resilient options for your indoor jars.
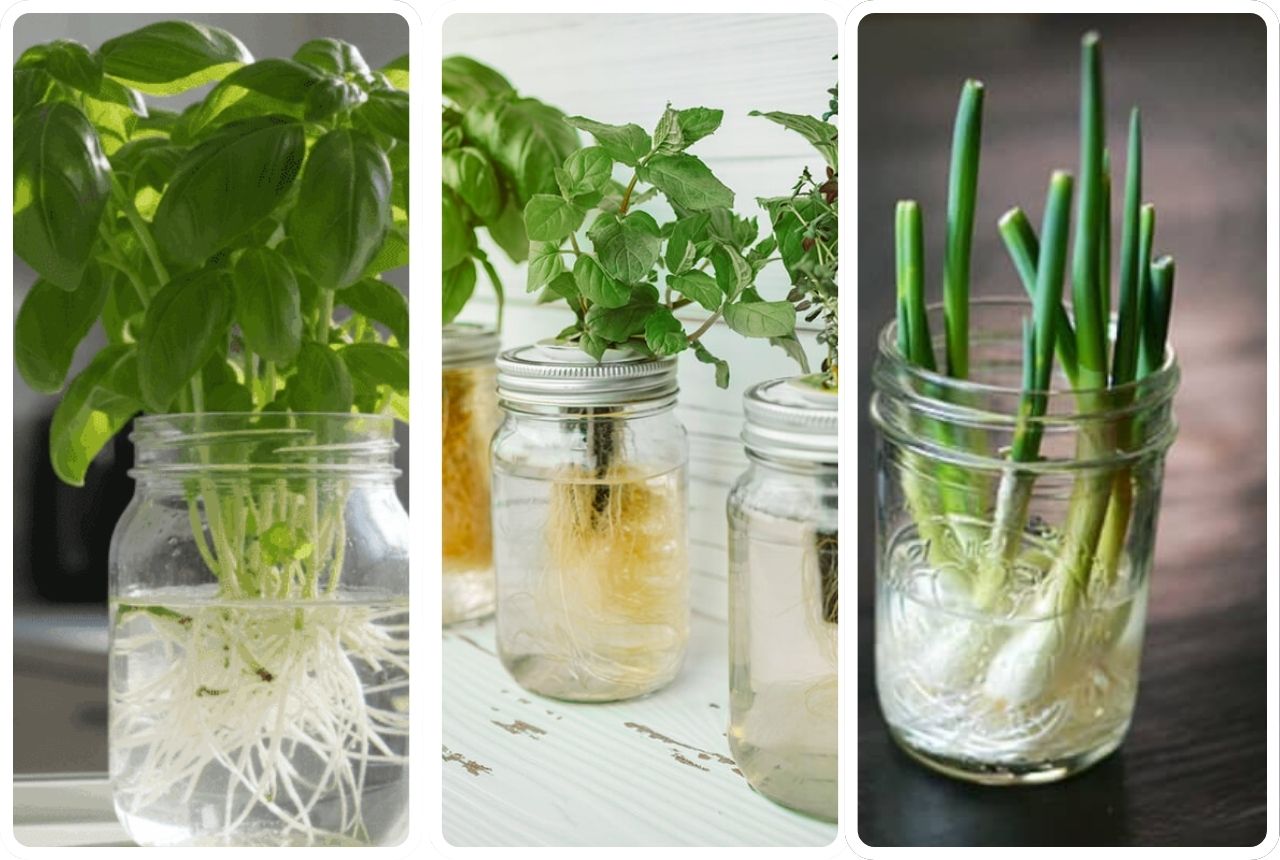
1. Basil (Ocimum basilicum)

Basil is arguably the easiest herb to grow in water. It roots incredibly fast—sometimes within just a few days. I love having a constant supply for fresh pesto or topping my homemade pizzas.
- How to grow: Take a 4-inch cutting and remove the lower leaves. Place it in a jar of water and watch the white roots sprout from the stem.
- Tips for success: Basil loves warmth. Keep it away from cold drafts or air conditioning vents, as it will wilt if it gets too chilly.
- Uses: It’s essential for Italian dishes, Thai curries, and fresh salads.
2. Mint (Mentha spp.)

Mint is practically a weed, which makes it perfect for water gardening. It is so vigorous that it will likely take over your jar in no time. I keep separate jars for peppermint and spearmint to avoid confusing the scents.
- How to grow: Just drop a few cuttings into water, and they will grow roots almost overnight. Mint is very forgiving of lower light levels compared to other herbs.
- Tips for success: Mint roots can get very long and tangled. Trim the roots occasionally if they start to fill up the entire jar.
- Uses: Perfect for mojitos, iced tea, or garnishing fruit salads.
3. Oregano (Origanum vulgare)

Oregano is a hardy perennial that adapts surprisingly well to water. It has a slightly trailing habit, so it looks beautiful as it spills over the side of a jar. The flavor of water-grown oregano is often a bit milder than soil-grown.
- How to grow: Use tip cuttings from a healthy plant. It takes a little longer to root than basil, so be patient.
- Tips for success: Make sure no leaves touch the water, as oregano leaves are slightly fuzzy and prone to rot.
- Uses: It is a staple for pizza sauce, Greek salads, and roasted meats.
4. Thyme (Thymus vulgaris)

Thyme is one of my favorites because of its delicate, tiny leaves. It’s a slow grower, but once it establishes roots in water, it’s very low-maintenance. It adds a sophisticated look to any windowsill.
- How to grow: Take green, flexible cuttings rather than the woody ones. Submerge the bottom half in water and keep it in a bright spot.
- Tips for success: Thyme is susceptible to mold, so ensure your kitchen has good air circulation.
- Uses: Use it for seasoning soups, stews, and roasted potatoes.
5. Rosemary (Rosmarinus officinalis)

Rosemary is notoriously difficult to grow from seed, so water propagation is a total shortcut. The woody stems take a few weeks to sprout roots, but once they do, the plant is very tough. It smells incredible every time you brush past it.
- How to grow: Use 5-inch cuttings from new, green growth. Remove the bottom needles completely before placing them in the water.
- Tips for success: Change the water more frequently for rosemary—about twice a week—to keep the woody stems from rotting.
- Uses: It’s the best herb for lamb, focaccia bread, and roasted chicken.
6. Sage (Salvia officinalis)

Sage has beautiful, silvery-green leaves that feel like velvet. It doesn’t need a lot of water to survive in soil, but it surprisingly loves the constant hydration of a water jar. It’s a slow-and-steady grower that pays off in flavor.
- How to grow: Take cuttings in the spring or fall. It prefers a very bright window to maintain its color and scent.
- Tips for success: Sage is prone to mildew, so don’t crowd too many stems into one jar.
- Uses: Essential for brown butter sauces, stuffing, and heavy winter dishes.
7. Stevia (Stevia rebaudiana)

If you have a sweet tooth, you need stevia in your life. It’s a fun “novelty” herb that is actually quite practical. You can pluck a leaf and drop it directly into your tea for an instant, calorie-free sweetener.
- How to grow: Take cuttings from a mature plant and place them in a warm, sunny spot. It loves the heat.
- Tips for success: Pinch off the top buds to prevent the plant from flowering, which keeps the leaves sweet.
- Uses: Use the leaves to sweeten tea, coffee, or smoothies.
8. Tarragon (Artemisia dracunculus)

Tarragon has a distinct licorice-like flavor that elevates any dish. It can be a bit finicky in soil, but it thrives in the controlled environment of a water jar. It’s a must-have for anyone who loves French cuisine.
- How to grow: Use cuttings from new growth in the spring. It needs a very bright, sunny window to grow well.
- Tips for success: French tarragon is superior to Russian tarragon in flavor, so make sure you’re using the right variety.
- Uses: It’s incredible in Hollandaise sauce, chicken salad, and vinegar infusions.
9. Chives (Allium schoenoprasum)

Chives are a member of the onion family and are incredibly easy to grow in water. Unlike the others on this list, you can actually grow these from the bulb end. If you buy chives with the roots attached, you’re halfway there.
- How to grow: Place the bulb end in a shallow jar of water. New green shoots will emerge from the top almost immediately.
- Tips for success: Only submerge the bottom half of the bulb to prevent the whole thing from turning to mush.
- Uses: They are perfect for loaded baked potatoes, omelets, and dips.
10. Lemon Balm (Melissa officinalis)
.jpeg)
Lemon balm smells like pure sunshine. It’s in the mint family, so it’s very easy to root and grows quite quickly. I keep a jar of this by my bed because the scent is so relaxing.
- How to grow: Take several cuttings and place them in a jar. It roots very easily and can handle slightly less light than basil.
- Tips for success: It can grow quite large, so don’t be afraid to give it a heavy trim every few weeks.
- Uses: Great for herbal teas, fruit garnishes, and desserts.
11. Cilantro (Coriandrum sativum)

Cilantro is a polarizing herb, but if you love it, you know you can never have enough. It has a reputation for “bolting” (going to seed) quickly in soil, but water growing keeps it leafier for longer.
- How to grow: Use healthy stems from a young plant. Make sure the water stays cool, as cilantro hates heat.
- Tips for success: Cilantro has a shorter lifespan than woody herbs, so start new cuttings every few weeks to keep the harvest going.
- Uses: Essential for salsa, guacamole, and street tacos.
12. Parsley (Petroselinum crispum)
.jpeg)
Parsley is way more than just a garnish; it’s packed with vitamins. It takes a bit longer to root in water, but it’s a very sturdy plant once it gets going. I prefer the flat-leaf Italian variety for the best flavor.
- How to grow: Take cuttings from the outer stems of a healthy bunch. Be sure to keep the center of the cutting above water.
- Tips for success: It loves light but doesn’t like to get too hot. A kitchen windowsill is usually perfect.
- Uses: Use it in tabbouleh, chimichurri, and garlic butter.
Tips for Success When Growing Herbs in Water
To keep your water garden thriving for months, you need to think about nutrition. Water has some minerals, but eventually, the plant will run out of food. Adding a drop of liquid seaweed fertilizer once a month gives them the boost they need to stay vibrant.
Keep your jars clean. If you see green algae forming on the glass, wash the jar and gently rinse the roots under cool water. Algae competes with your plants for nutrients, so it’s best to keep things sparkling clear.
Also, pay attention to your indoor environment. While these herbs are year-round, they don’t like being blasted by a heater or sitting in a frozen window draft. Treat them like a living part of your home, and they will reward you with flavor.
Common Mistakes to Avoid
The biggest mistake I see people make is overcrowding the jars. If you cram ten stems into one narrow bottle, they won’t get enough oxygen, and they’ll rot. Give each stem some breathing room so the roots have space to expand.
Another rookie move is using water that is too cold. Use room-temperature water to avoid shocking the plant’s system. FYI, extreme temperature shifts can kill a cutting before it even has a chance to sprout a single root.
Lastly, don’t forget to clean your tools. Using dirty scissors can introduce bacteria directly into the stem’s “veins.” A quick wipe with rubbing alcohol before you take your cuttings ensures a healthy start for your new herb garden.

Growing herbs in water is honestly one of the most satisfying DIY projects I’ve ever tried. It’s cheap, it’s beautiful, and it makes cooking so much more fun. There’s nothing quite like snipping fresh basil for your pasta while it’s snowing outside.
I highly recommend starting with basil or mint since they give you that “win” almost immediately. Once you see those first roots sprout, you’ll be hooked on your new soil-free garden. Would you like me to help you design a specific light setup or suggest the best types of glass jars for your kitchen space?