Stop spending a fortune at the grocery store on wilted greens that turn to slime in your fridge within two days. You can actually grow a never-ending supply of fresh produce in a tiny space by choosing “cut-and-come-again” varieties.
I started doing this three years ago on my balcony when I got tired of throwing away half-empty bags of expensive organic spinach, and I haven’t bought a bag of salad mix since. It’s honestly one of the most rewarding shifts I’ve made in my gardening journey.
Think about it: most people treat their garden like a one-and-done deal, but these plants are the gift that keeps on giving. You aren’t just growing a vegetable; you’re growing a sustainable system that feeds you for months on end.
Whether you have a massive backyard or just a few sunny windowsills, regrowing your veggies is the ultimate life hack for fresh, cheap, and nutritious eating. IMO, it’s the best way to get started if you’re new to the green-thumb lifestyle.
Why Grow Cut-and-Come-Again Vegetables?
Growing these specific veggies means you harvest just the leaves you need while the plant stays alive to grow more. Most people think you have to pull the whole plant out by the roots, but that’s a total waste of potential.
Regenerative harvesting keeps your kitchen stocked without the need for constant replanting or a massive backyard.
Here are the main reasons why I swear by this method:
- Massive Cost Savings: You buy one packet of seeds for $3 instead of a $5 bag of salad every week.
- Peak Freshness: You harvest minutes before eating, so the nutrients are at their maximum level.
- Space Efficiency: You don’t need a huge plot because a few plants produce a high volume of food.
- Resilience: These plants actually grow back stronger and bushier every time you give them a “haircut.”
- Reduced Waste: You only pick what you are going to eat that night, so nothing ever rots in the crisper drawer.
1. Lettuce (Loose-Leaf and Romaine)
Lettuce is the poster child for the “Grow Forever” philosophy. Unlike iceberg lettuce, which grows in a tight ball, loose-leaf varieties allow you to pluck individual leaves from the outside. This keeps the central growing point intact so the plant can keep pumping out new foliage for your dinner.
How to Harvest:
- Select the outer leaves that are at least 3-4 inches long.
- Snip the stem about an inch above the soil line using clean garden shears.
- Leave the inner core (the tiny baby leaves) untouched so the plant continues to photosynthesize.
Tip:
If you prefer Romaine, you can actually cut the entire head off about two inches above the ground. Within a week, you’ll see miniature leaves sprouting from the stump. It’s honestly like magic.
2. Kale
Kale is basically the iron man of the vegetable garden. It handles frost like a champ and keeps producing even when the weather gets a bit grumpy. I’ve harvested kale in the snow and it still tasted amazing—actually sweeter than in the summer because the cold turns the starches into sugars!
How to Harvest:
- Identify the largest leaves at the very bottom of the main stalk.
- Snap the leaf downward until it pops off the stem cleanly.
- Work your way up but always leave a “tuft” of 4-5 leaves at the very top to keep the plant healthy.
Varieties to Try:
Lacinato (Dino) Kale is my absolute favorite because the leaves are flat and easy to chop. If you want something prettier, Red Russian kale adds a beautiful purple tint to your salads and handles cold weather exceptionally well.
3. Spinach
Spinach can be a bit finicky because it hates heat, but it’s a powerhouse for cut-and-come-again setups. If you time it right during the spring and fall, you can get four or five harvests from the same patch. It’s way more tender than the stuff you find in plastic tubs at the store.
How to Harvest:
- Wait for the plant to have at least 6-8 sturdy leaves before your first cut.
- Pinch off the outer stems right at the base with your fingernails or scissors.
- Avoid the crown, which is that central point where all the leaves meet the roots.
Tip:
Harvest your spinach in the morning when the leaves are at their crispest. If the weather starts warming up, provide some afternoon shade to keep the leaves from turning bitter or bolting.
4. Swiss Chard
Swiss Chard is the most underrated vegetable in the garden, mostly because it looks like a piece of art. The stalks come in vibrant yellows, reds, and pinks. It’s incredibly hardy and survives heat much better than spinach or lettuce, making it a summer staple.
How to Harvest:
- Start from the outside and pick the leaves that are the size you want for cooking.
- Use a sharp knife to slice the stalk about an inch above the ground.
- Remove any yellowing leaves even if you aren’t eating them to keep the plant’s energy focused on new growth.
Bonus:
Don’t throw away those colorful stems! Chard stems are delicious when sautéed with a little garlic and olive oil. They have a texture similar to celery but with a much milder, earthier flavor.
5. Arugula (Rocket)
Arugula adds a peppery kick that levels up any sandwich or pizza. It grows incredibly fast, often reaching harvest size in just a few weeks. Regular cutting is essential here because arugula wants to flower and go to seed the second it feels a hint of heat.
How to Harvest:
- Gather a handful of leaves in one hand once they reach 3 inches in height.
- Cut the entire bunch straight across, leaving about an inch of stubble.
- Wait 10-14 days for the next “flush” of greens to reach full size.
Tip:
Harvest the leaves when they are young. Younger leaves have a milder flavor, whereas older leaves can become aggressively spicy and a bit tough for raw salads.
6. Mustard Greens
If you like bold flavors, mustard greens are a must-have. They bring a spicy, horseradish-like zing to your meals. They are fast growers and work perfectly for people who want high yields in a short amount of time.
How to Harvest:
- Focus on the larger leaves on the perimeter of the plant.
- Snip the stems individually to ensure you don’t damage the rest of the plant.
- Limit your harvest to no more than a third of the plant at once to ensure a quick recovery.
Varieties to try:
Giant Red mustard greens look stunning in a garden bed and have a deep, complex flavor. For something a bit more unique, try “Mizuna” types which have frilly leaves and a slightly more delicate spice level.
7. Endive and Escarole
These bitter greens are staples in Italian cooking and gourmet salads. They are much tougher than lettuce and can handle a bit of neglect. They add a sophisticated crunch that balances out heavier dressings or fatty meats perfectly.
How to Harvest:
- Peel away individual leaves as you need them for a specific meal.
- Cut the whole head off two inches above the soil if you want a big harvest.
- Keep the roots watered to encourage a second, smaller head to form in the center.
Bonus:
If the flavor is too bitter for you, try “blanching” the heart. Cover the center of the plant with a bowl or tie the outer leaves together a few days before harvest to block out the sun. This mellows the flavor significantly.
8. Pak Choi (Bok Choy)
Pak Choi is a staple in my stir-fry recipes, and it’s surprisingly easy to regrow. It loves cool weather and grows very quickly. The crunchy white stems and tender green leaves provide two different textures from one single plant.
How to Harvest:
- Remove the outer stalks by cutting them at the base with a paring knife.
- Clear any debris from the base to keep the remaining plant healthy.
- Leave the center intact to allow for continuous growth throughout the spring.
Tip:
Watch out for slugs! They love the juicy stems of Pak Choi as much as we do. Check your plants in the evening to make sure no unwanted guests are munching on your endless harvest.
9. Mizuna
Mizuna is a Japanese mustard green that is incredibly prolific. It has a mild, peppery flavor and beautiful feathery leaves. It is one of the most reliable regrowers I’ve ever worked with; you can’t really kill it by over-harvesting.
How to Harvest:
- Grab the leaf tops like you’re holding a ponytail.
- Shear them off about an inch above the soil.
- Water the base immediately after cutting to stimulate new growth.
Bonus:
Mizuna is extremely slow to bolt. This means you can keep harvesting from the same plant long after your other lettuces have gone to seed and turned bitter in the summer sun.
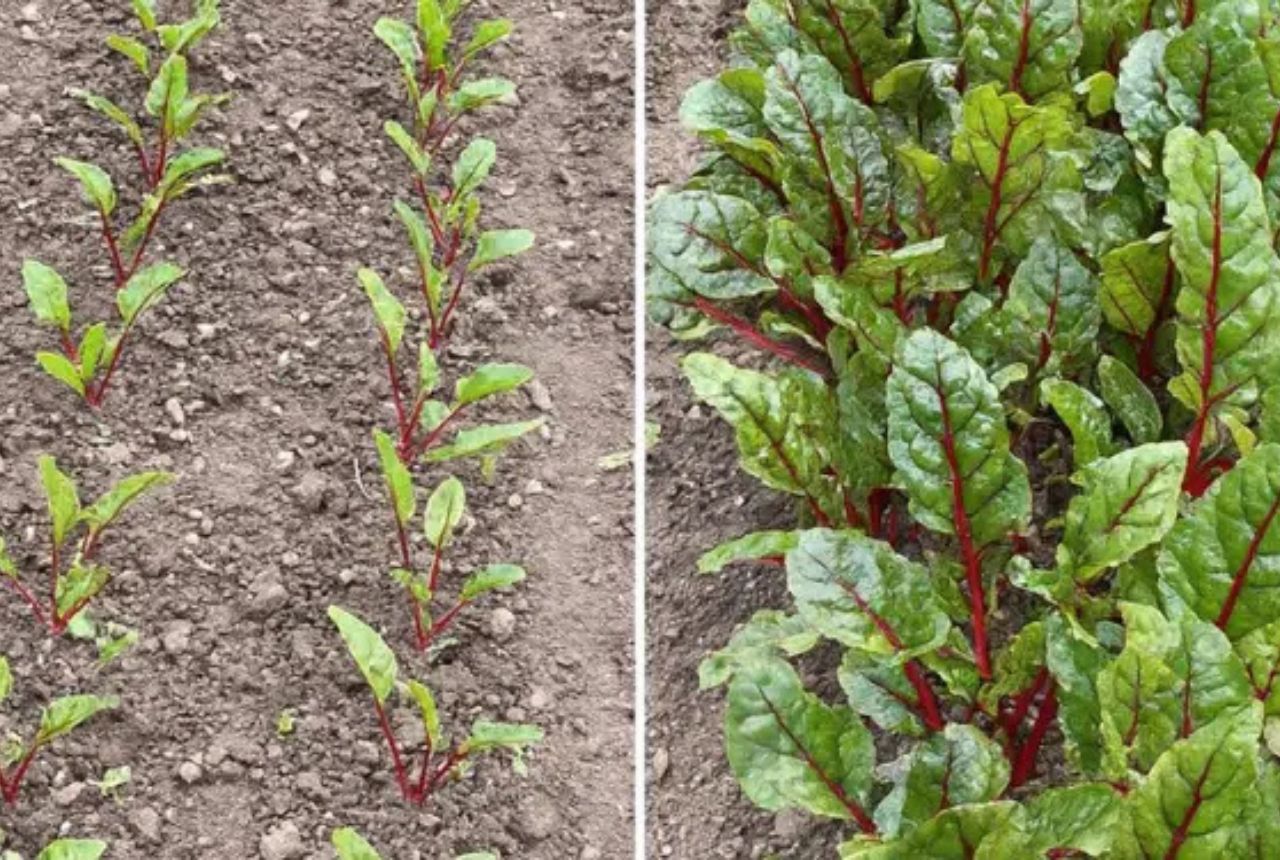
10. Beet Greens
Most people grow beets for the roots and throw the tops away, which is a tragedy. Beet greens taste almost exactly like spinach but with a slightly sweeter, earthy undertone. They are packed with vitamins and grow back remarkably fast.
How to Harvest:
- Identify 1-2 large leaves on each beet plant.
- Snip them off near the base, being careful not to tug on the root.
- Leave the majority of leaves so the beet root continues to swell underground.
Pro Tip:
If you bought beets at the store with the tops still on, cut off the top inch of the beet root and sit it in a shallow saucer of water. It will actually sprout new greens on your windowsill! FYI, this works with carrots too.
11. Collard Greens
Collards are the backbone of Southern cooking for a reason. They are incredibly hardy and produce massive, filling leaves. They can survive both high heat and deep freezes, making them a year-round producer in many climates.
How to Harvest:
- Snap off the lowest, largest leaves by hand.
- Harvest regularly to prevent the leaves from becoming too tough and fibrous.
- Keep the top bud growing tall so the plant continues to produce.
Bonus:
Collard greens are quite tough, so they don’t wilt as easily as spinach. This makes them the perfect “green” to add to slow-cooker soups or stews because they hold their texture and flavor beautifully.
12. Celery
Regrowing celery is a classic garden “hack” that actually works. Most people find starting celery from seed difficult because it takes forever. Starting from a base is much faster and gives you a head start on your harvest.
How to Harvest:
- Slice off the outer stalks one by one as you need them for a recipe.
- Work from the outside in to let the heart keep producing new stalks.
- Trim any yellowing leaves to keep the plant looking tidy.
Tip:
Celery is a “heavy feeder” and loves water. Keep the soil consistently moist and add a bit of compost every few weeks to ensure the stalks stay juicy and crisp rather than hollow.
13. Parsley
Parsley is more than just a garnish; it’s a nutritional powerhouse. It’s a biennial, meaning it lives for two years. This gives you a huge window for harvesting before the plant eventually flowers and finishes its life cycle.
How to Harvest:
- Find the stems on the outermost edge of the cluster.
- Cut them at the base of the plant rather than just nipping the leaves.
- Regularly trim the plant to keep it from getting too lanky or leggy.
Bonus:
Parsley is a great companion plant. It attracts beneficial insects like predatory wasps that eat the pests currently trying to snack on your kale and lettuce. It’s a win-win for your garden.
14. Cilantro (Coriander)
Cilantro is notorious for “bolting” or dying off as soon as the sun comes out. However, if you use the cut-and-come-again method, you can significantly extend its lifespan. Fresh cilantro is 100x better than the soapy-smelling stuff from the store.
How to Harvest:
- Snip the upper leaves once the plant is at least 6 inches tall.
- Never take more than half of the plant at once.
- Cut the central stem to encourage the plant to branch out and become bushier.
Tip:
If your cilantro does start to flower, don’t pull it out! The flowers are edible and taste like citrusy cilantro. Plus, the seeds it produces are actually the spice known as coriander.
15. Garlic Chives (Chinese Chives)
Garlic chives are the ultimate “set it and forget it” vegetable. They are perennials, meaning they come back every single year without you having to do a thing. They have a lovely mild garlic flavor that works in almost any savory dish.
How to Harvest:
- Bundle a handful of leaves together.
- Cut the entire bundle about two inches above the ground.
- Let the plant rest for a week or two until the leaves grow back to their original length.
Bonus:
The white flowers that garlic chives produce in late summer are gorgeous and edible. They look amazing as a garnish on salads or soups and have a concentrated garlic punch that will surprise your dinner guests.
Final Thoughts
I honestly think everyone should have at least a few of these in a pot or garden bed. It’s incredibly empowering to walk outside and grab a handful of fresh food without having to spend a dime or drive to the store.
Start with something easy like lettuce or kale and see how it goes. The feeling of watching a plant grow back after you’ve already eaten from it is addictive. Trust me, once you start an endless harvest, you’ll never want to go back to buying pre-packaged greens again.
Would you like me to create a quick guide on the best potting soil mix for these specific regrowing vegetables?